Kika Jumpsuit Bustier Fitting Guide
KIKA is a dress or playsuit model with a bustier worked with cutouts like a piece of corsetry. Although the model has been tested on many sizes and body shapes to obtain the most versatile fit possible, and which offers such a pretty cut from 34 to 52, you may need to adjust the model (we do not all have the same chest shape or height, some have a short bust and others long etc ...).
Don't panic, we've thought of everything to make you look your best in KIKA , and we're providing you with this free bustier adjustment guide.
Basic material to perform a transformation
To transform a pattern, it is advisable to have:
- Adhesive tape
- A parrot rule
- A square
- A graduated ruler
- A support sheet
- A pair of paper scissors
- A fine-tipped pencil/criterion
Preparation of the parts
Before making any changes to the pieces making up Kika's front bodice, it is necessary to prepare some pieces. First of all, it is essential to work without a seam allowance and to merge the top front band with the side front and middle front pieces.
Remove seam allowances
- Define the size in which the Kika suit will be made:

- For A, C and D cups, it is not advisable to choose your pattern size based solely on your bust measurement because the garment would not fully correspond to your own body shape. It is therefore advisable to choose your size based on your upper chest measurement and not your chest circumference. To do this, refer to the pattern's measurement table, always in the "Chest circumference" column. Note that the size chosen is always built on the basis of a B cup.
- Trace the following pattern pieces in the defined size: the front side, the center front, the top left front strip, the top right front strip.
- Subtract 1 cm from the inside of the pieces to obtain the lines without seam allowance. It is important to check that all the marks are still present on the pieces.
- Cut off excess paper.

Merge the top front strip with the side and center front
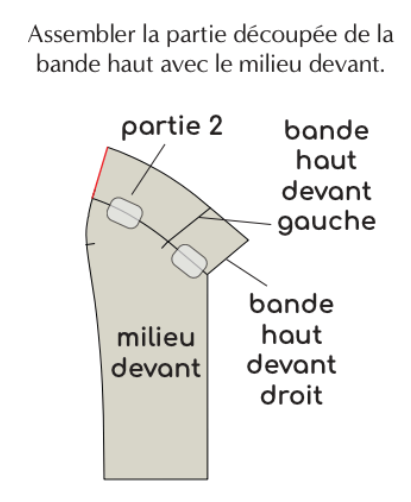
- Overlap the two strips making up the top front. We observe that their shape is identical except for their length. The left strip is shorter in the middle front than the right strip.
-
Transfer the front middle edge of the left strip to the right piece. Use only the right strip to carry out the rest of the preparations. This will avoid having to repeat all the operations twice when transforming the pieces.

- Place the top front strip against the top edge of the front side piece. The sides of the two elements (on the left in the drawing) must be perfectly aligned. The two pieces will then fit together perfectly at the cutout. Secure the two elements with adhesive tape. Draw a line across the entire width of the top front strip, in line with the strap cutout.
- Cut on the line. The strip is now split into 2 parts.

- Place part 2 of the top front strip against the top edge of the middle front piece. The two parts fit together perfectly along the cut-out again. Secure the two pieces with adhesive tape.

The front bodice pieces are now ready to be transformed!
Adaptation of the KIKA bustier with strap cutout: reduction or enlargement of the cup
The technique explained in this tutorial allows you to enlarge the front pattern so that the bodice perfectly covers the chest.
If the bodice needs to be reduced instead of enlarged, the technique will be the same. Instead of spreading the lines apart, they will need to be overlapped.
Front side modifications
Construction of transformation lines
The most significant modification is made to the front side piece. A slight adaptation will also need to be made to the middle front piece.
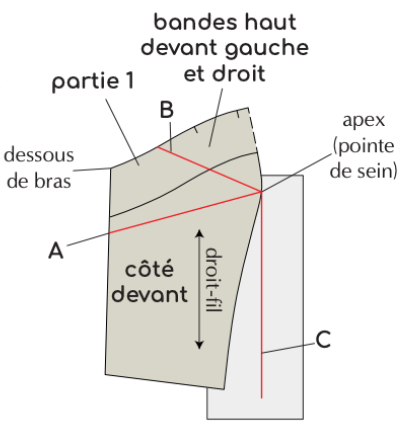
- Check that a mark is placed at the apex (breast tip), that is to say on the most rounded part of the piece. This point will serve as a basis for the transformation of the pattern.
- Starting from this point, draw 3 axes on the pattern:
- Draw a line A towards the side, without crossing the high strip in front.
- Draw a biased line B ending in the hollow of the neckline, towards the underarm. Avoid the upper part where the straps are planned.
- Draw a parallel line C along the straight grain all the way down. This axis passes outside the part, you must remember to fix it beforehand on a paper support. 
Transformation of the boss
- Cut on lines A and B, stopping 2-3 mm before the neckline and apex point.
- Cut the paper backing along line C. The excess to the right of it should be removed.
- Draw a vertical line on a new sheet of paper.
- Position the pattern piece on this sheet, with the C axis and apex point exactly against the vertical line.
- Secure the area of the part not requiring a pivot using tape.

- Slide the bottom of the part so that line C moves parallel to it by the amount needed to enlarge. The A and B axes should open naturally.
- Secure the area near the underside of the sleeve.
- To absorb the existing clamp following the pivot of the parts, draw an axis in the extension of the lower line of the clamp, until meeting point x, on the other side of the gap.
-
Cut on the line, stopping 2-3 mm before the apex point.

- Close the clamp, pivoting the entire lower part of the part. A new gap is formed at point x. This is the principle of the clamp pivot.
-
The spacing measurement obtained towards the apex point (tip of the breast) corresponds to the apex and will be absorbed when mounting with the middle front piece.

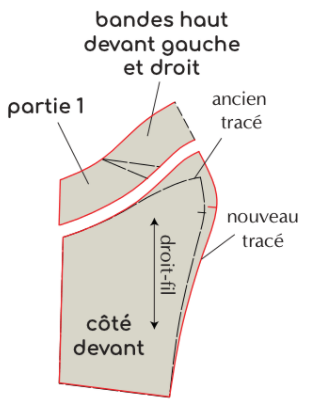
- Soften the angled line at the pivot point along the neckline.
- Trace the cut between the front side piece and the top front strip. Measure the width of the strip at the strap cutout (y) and ensure that the entire strip maintains this width.
- Trace the strap cutout by slightly digging the line below the chest.
-
Mark the new mounting notch at the level of the breast tip. It must be located in the center of the area corresponding to the ambuse.

- Separate part 1 of the top strip and the front side.

Mid-Front Modifications
- Draw an axis perpendicular to the straight grain on the bottom of the middle front piece.
- Cut on the line and separate the 2 parts of the missing value so that the piece has the same length as the front side piece between the waist and the mounting notch.

Reconstruction of the upper left and right front bands
- Assemble the transformed part 1 (and identical for the left and right bands) with the untransformed part 2 of each of the right and left bands.

After all these modifications, it is advisable to carry out a test in a canvas before starting to make your garment.
Vertical movement of the PRINCESS CUTOUT
The technique explained in this tutorial allows you to visually move the cutout placed between the front and middle front pieces. It can thus be shifted vertically towards the side or towards the middle front. During this modification, the nipple tip and the rounding allowing the chest to be accommodated are also moved.
Construction of transformation lines
The modification to be made must be carried out simultaneously on the front side (merged with part 1 of the top band) and the middle front (merged with part 2 of the top band). If this basic principle is not respected, an imbalance will be observed between the different pieces of the pattern.
- Draw an axis parallel to the straight grain on the front and middle front pieces. Place it anywhere as long as you avoid the assembly notches.
- Cut on the axes. Each piece is thus split into 2 parts: zones a and b on the front side and zones c and d on the middle front.

Pattern transformation: moving the cutout to the side
- On the front side piece, slide zone b parallel to zone a of the necessary value.
- On the middle front piece, space area c and area d parallel to each other using the same value as for the front side.
The side piece is therefore reduced while the middle piece is enlarged.

Redraw the outline of the parts by drawing curved and harmonious lines. 
- Separate part 1 (top band) and the front side.
- Separate part 2 (top band) and the middle front.

Pattern transformation: moving the cutout to the center front
- On the front side piece, space area a and area b parallel to each other by the necessary amount.
- On the middle front piece, slide area c parallel to area d using the same value as for the front side.
The side room is therefore enlarged while the middle room is reduced. 
Redraw the outline of the parts by drawing curved and harmonious lines. 
- Separate part 1 (top band) and the front side.
- Separate part 2 (top band) and the middle front.

Reconstruction of the upper left and right front bands
- Assemble the transformed part 1 (and identical for the left and right bands) with the also transformed part 2 of each of the right and left bands.

After all these modifications, it is advisable to carry out a test in a canvas before starting to make your garment.
Horizontal displacement of the breast tip
Depending on the shape of her chest and the arrangement of the tip of the breasts, it may be interesting to move the mounting notch on the bustier and corresponding to the tip of the breast as well as to modify the curve along the strap cutout. This slight modification can be very important concerning the fit of the model.
Pattern transformation: raised or lowered breast point
The modification must be made on both the front side and the middle front so that the parts fit together perfectly when assembled.
- On the front side piece, raise/lower the mounting notch corresponding to the breast point parallel to the straight grain.
- Trace the strap cutout.
For the case of the raised notch and taking as a reference the basic outline before modification: the rounding must be more marked above the notch. Below, the line must be slightly hollowed.
For the case of the notch lowered and taking as a reference the basic outline before modification: the rounding must be more marked below the notch. Above, the line seems flatter.
- Repeat this process on the center front piece.
-
Measure the lines along the cutout and on either side of the notch. Check that the measurements are identical on both pieces.

- Separate part 1 (top band) and the front side.
-
Separate part 2 (top band) and the middle front.

Reconstruction of the upper left and right front bands
- Assemble part 1 (identical for the left and right strips) with part 2 of each of the right and left strips.

After all these modifications, it is advisable to carry out a test in a canvas before starting to make your garment.


