How to navigate between different sizes of a pattern?
This manipulation is performed for people with a difference in size between the upper and lower body. We are talking in particular about a V or A silhouette, but many other cases are compatible with this method.
Basic material to perform a transformationTo transform a pattern, it is advisable to have:
-
Adhesive tape
-
A parrot rule
-
A square
-
A graduated ruler
-
A support sheet
-
A pair of paper scissors
-
A fine-tipped pencil/criterion
Definitions
Let's first start by defining the following terms:
The upper part of the bust is more developed than the lower part. The shoulders, shoulders and chest are wider than the hips.
A-shaped silhouette
The lower part of the body is more accentuated than the upper bust. The hips are wide and the buttocks are stronger while the chest is small and the shoulders are quite thin.
Case study
If when reading the measurement chart, you notice that your waist, chest and hip measurements do not correspond to a single size but to several, then you will have to navigate between the sizes of the pattern in order to obtain a layout perfectly adapted to the curves of your body. Thus, it is possible to adjust dresses, pants and jumpsuits with fitted cuts to your own body shape.
As for very loose models, no alterations are necessary. The main measurement to take into account is that of the part that fits the body the most. The loose part of the model will be enough to adapt to the rest of the body.
Transformation
The work is done on the side line of the pattern. The example given concerns the case of a dress. But the technique is identical for any other model.
-
Measure your chest, waist and hips. Compare the values found with the measurement table. Choose the size for your chest and the size for your hips.

-
If the pattern consists of cuts that split the side seam into several parts, then join the elements before making the modification.
-
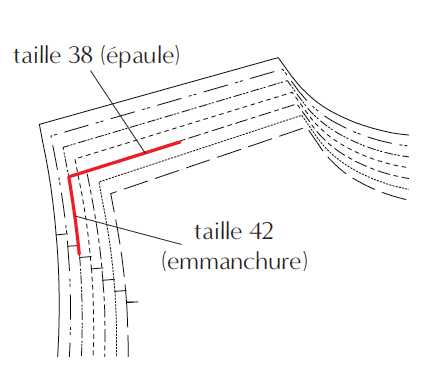
Using a felt-tip pen, mark the different lines corresponding to your body shape, by navigating between the sizes of the pattern. For the bust, select size X, and highlight the neckline, shoulders, armhole, and side, stopping before the waist. For the bottom, select size Y, and highlight the rounded part of the hips, going down to the bottom, then continue along the hem.
-
Connect the 2 lines by the size in a harmonious way. It is advisable to use a pattern maker's ruler also called a "parrot" in order to trace this part.
Example 1:
Chest size: 88 cm corresponding to a 38.
Waist size: 64 cm corresponding to a 38.
Hip size: 101 cm corresponding to a 42.
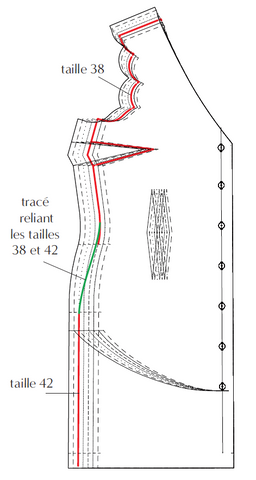
Example 2:
Chest size: 96 cm corresponding to a 42.
Waist size: 75 cm corresponding to a 42.
Hip size: 97 cm corresponding to a 40.
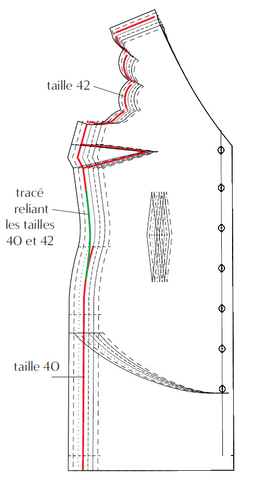
Once the transformation is done, it is important to check that the assembly lines of the different parts measure exactly the same length.
Note : it is also possible to grade between 2 tracings, if its measurements do not correspond to either a size X or a size Y.
Variant of the method
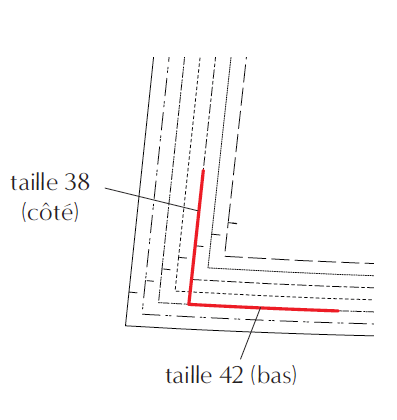
This method can also be applied to very specific parts of the pattern, when you want to make a very slight modification. You will have to increase or reduce the outline of the part to be modified and come and retrieve the outline of another size.
Here is a non-exhaustive list of existing possibilities:
-
Increase/decrease the length of a garment.
-
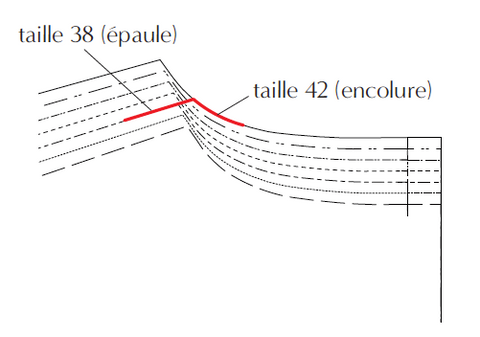
Increase/decrease shoulder length.
-
Increase/decrease neckline width.
